Exercise
Compare two overlapping survey lines against each other
Make sure you have displayed two overlapping survey lines in the graphics window, using the same method as in one of the previous exercises. For instance, display the two lines 0000_20060112_130156_Simrad_echo.all and 0001_20060112_131814_Simrad_echo.all.
- In the Geocap main window, click Windows > New > Cross Section Window. The cross section window will appear at the bottom of the screen.

- In the cross section window click the arrow to right of the
 icon, and open the menu.
 - Click the
 Digitize cross section entry in menu.
 - Create a profile over the overlapping area, by digitizing two points in the graphics window using your left mouse button.
You should now see the multibeam soundings along the profile in the cross section window. You can zoom using your right mouse button, use the left mouse button to pan and the mouse wheel to scale the z-direction.
Points at a certain distance on both sides of the cross section are projected on to the cross section window. You can decide this distance by editing the Point projection distance.
Exercise
Edit the color and size of points in the cross section window
- In the cross section window, right click one the name of one of the survey line and select Edit.

- In the dialog that pops up, change the Point color to another color than the default.

- You should now be able to distinguish the points on each line from each other.

Try out different display options in the edit dialog.
Exercise
Edit the size, direction and position of the profile
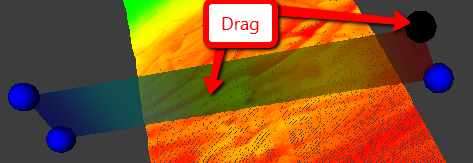
- In the graphics window click on the profile frame. You should now see one sphere in each corner of the profile.

- Click and drag one of the spheres to re-size or change the angle of the profile.
- Click in the middle of the profile and drag in order to move the whole profile.
Unknown macro: {pagebreak}