Publishing data to Seismic Server
- Anders Moe
- Jan Henrik Koren
The following section outlines the process of publishing seismic data to the Seismic Server. The actual publishing process varies depending on the location and format of the data files but the main steps are always:
- Use the ZGY tool, Seismic Explorer or Ground Model to create a feature class from your seismics.
- Copy the seismic data files created in step 1) to a location that is accessible from the ArcGIS Server hosting the Seismic Server SOE. The data files will be either in VDS or ZGY formats or rasters created from the SEG-Y files.
- In the feature class created in step 1) modify the URL field to reflect the new location of the seismic data files on the server. The Seismic Server will use this field these to lookup the data.
- Publish the feature class as a Map Service.
- Register the Geocap Viewer web app widget in your portal.
- Create a web app using the Web App builder and add the Geocap Viewer widget.
With these steps you will have a web based seismic web viewer that supports tight integration with ArcGIS web maps.
The details vary somewhat depending on seismic format (ZGY or SEGY) and whether the data already reside on the server or not. These scenarios can be characterized as follows:
Scenario 1 : The ZGY files are already in a location accessible by the the server. This is the easiest scenario since no file copying or file path modification is required. This scenario requires the following steps:
- The ZGY files are already in a location accessible by the ArcGIS Server.
- You can execute the Geocap ZGY command line tool on the server.
- Publish the feature class as a Map Service.
- The ZGY file paths in the feature class need not be modified.
Scenario 2 : ZGY files on a local machine not accessible by the server.
- Use the ZGY tool on your local machine to create feature classes from the data.
- Copy the data files (ZGY files or rasters) to a location accessible by the Seismic Server.
- Use the Set Seismic URL tool to alter the data file paths in the seismic feature class to match the new location set in 2).
- Publish the feature class as a Map Service.
Scenario 3 : Your data files are on SEGY format and residing on a local machine.
- Use the Seismic Explorer for ArcGIS or Ground Model for ArcGIS Pro to convert the SEGY files to VDS files or rasters on your local machine.
- Copy the VDS files or rasters to a location that is accessible from the Seismic Server.
- Use the Set Seismic URL tool to alter the VDS or raster data paths in the seismic feature class to match the new location set in 2). You can also set the contents of this field manually.
- Publish the feature class as a Map Service
The workflow
The following diagram depicts the workflow involved when setting up a seismic server with data.
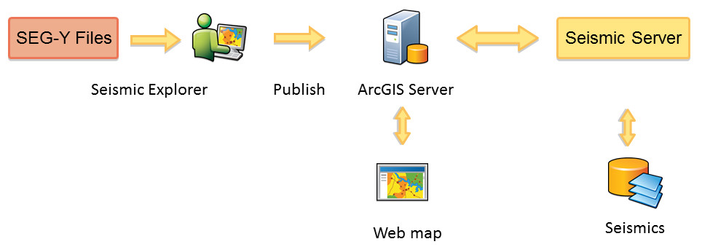
The documentation below will provide more details, but the main steps are :
- Import the seismic files using Seismic Explorer for ArcMap, ZGY tool or Ground Model for ArcGIS Pro.
- For rasters:
- For small datasets you can use the Raster with Statistics and Pyramids as output format to have pyramids and stats created as part of the import.
- For larger datasets you should choose Raster File as output format and then use the built-in ArcGIS tools to create pyramids and statistics as separate post-steps.
- For rasters:
- If you have converted SEG-Y files you may use the Ground Model or Seismic Explorer 3D visualization to verify that the seismic data has been correctly read and converted.
- Copy the VDS files, seismic rasters or ZGY files to a directory to which the server has read access. This location will probably be a folder that is registered as a data store on the server.
- Replace the value of the URL field in the seismic feature class corresponding to the target location on the server used in the previous step. See the section on manually modifying the urls at the bottom of this page for details.
- Install the Seismic Server SOE on the server. This will provide the Seismic Server capability when publishing maps. Click the Site button on the server administration page and then select Extensions.
- Create a map containing the seismic survey navigation features created in the geodatabase.
- Publish the map and make sure to enable the Seismic Server capabiliity.
- When the map is published verify that the data is in place using a test URL (details below).
- Open the seismic server web app to view your data, see the section Web Client for details.
The rest of this chapter describes how to publish maps containing 2D and 3D seismics to an ArcGIS server as well as configuring the web client.
Publishing seismic data
Since ArcGIS has no native support for seismic data a few manual steps are required in order to make the seismics accessible to the seismic server. This section assumes that seismic data has been converted already using Ground Model, the ZGY tool or the Seismic Explorer.
The following sections go into this in more detail.
Publishing seismic 2D data
When reading seismic 2D from SEG-Y using the Seismic Explorer for ArcGIS or the Ground Model add-in for ArcGIS Pro the result will be a feature class with navigation lines and the data stored as VDS files or rasters in the same geodatabase as the feature class. This gives you the following options when publishing.
- Keep everything in a geodatabase. Just copy the feature class and VDS files/rasters to a registered geodatabase on the server and publish from there. You do not have to modify the URL field in the feature class.
- Store the seismic data as VDS files or rasters. If you would rather have the data stored as external VDS files or rasters rather than have them in a geodatabase:
- Copy the files to any registered data folder on the server. Make a note of the location as seen from the server.
- Use the Set Seismic URL tool to create a copy of the navigation feature class with the correct target URL as used in the previous step
- Create a map containing the seismic navigation features and publish the map. This will give you a URL to the published feature layer in the map server.
Publishing seismic 3D data
Publishing 3D seismics is similar to publishing 2D seismics but with the added option of using 3D VDS or ZGY files.
Publishing from SEG-Y/VDS files
- Import the seismic files using Seismic Explorer for ArcMap, Ground Model or the or ZGY tool.
- For rasters:
- For small datasets you can use the Raster with Statistics and Pyramids as output format to have pyramids and stats created as part of the import.
- For larger datasets you should choose Raster File as output format and then use the built-in ArcGIS tools to create pyramids and statistics as separate post-steps.
- For rasters:
- Copy the VDS files/rasters to a registered data folder or geodatabase to which the server has access. Make a note of the location as seen from the server.
- Use the Set Seismic URL to create a copy of the navigation feature class with the correct target URL as used in the previous step
- Create a map containing the seismic outline features and publish the map. This will give you a URL to the published feaure layer in the map server.
Publishing from ZGY files
The Seismic Server has the option of reading directly from a ZGY on a server. This will save you time and space since there is no need for raster conversion. Both alternatives are listed below.
- Publish using ZGY to raster conversion:
- Use the ZGY tool to convert ZGY files to rasters with an associated feature class. Make sure the button for raster conversion is checked.
- Copy the rasters to a registered data folder or geodatabase to which the server has access. Make a note of the location.
- Use the Set Seismic URL tool to create a copy of the outline feature class with the correct target URL as used in the previous step
- Create a map containing the new seismic outline features class and publish the map. This will give you a URL to the published feature layer in the map server.
- Publish using the original ZGY file
- Create a navigation feature class using the ZGY tool. Disable the checkbox for raster conversion.
- Copy the ZGY file to a registered data folder on the server. Make a note of the location as seen from the server.
- Use the Set Seismic URL tool to create a copy of the outline feature class with the correct target URL as used in the previous step.
- Create a map containing the new seismic outline features class and publish the map. This will give you a URL to the published feature layer in the map server.
Verify server setup
Once your map is published you should verify that the Seismic Server is running and has access to the seismic data using URL's similar to these. In the examples the layer number has been assumed to be 0 and the object id of the survey to be 1. You should replace these numbers and the name of the server and map service with the actual values for your site.
- Seismic Server version : https://geocap.geodata.no/arcgis/rest/services/seismicportal/MapServer/exts/SeismicServer/version
- Metadata for 2D seismics, examining line with OID 1 in layer 12 : https://geocap.geodata.no/arcgis/rest/services/seismicportal/MapServer/exts/SeismicServer/layer/12/line/1/info?f=pjson
- Metadata for 3D seismics, examining survey feature OID 1 i layer 6 : https://geocap.geodata.no/arcgis/rest/services/seismicportal/MapServer/exts/SeismicServer/layer/6/survey/1/info?f=pjson
Here is an actual example from the Geocap demo server. The layer number in the map server is 6 and the OID of the outline feature in the feature class is 1 :
Each request should respond with meaningful data. In particular you should verify that the dataFound field is set to true. If this shows false it means that the server can not access the seismic data files. Verify that the URL field in the published feature class points to the location of the seismic rasters or ZGY files. If you have the rasters stored in the same geodatabase as the feature class this field should be empty.
If dataFound show true : congratulations. Everything has been correctly configured and the Seismic Server is ready to serve subsurface data to the client. You're now ready to set up your seismic web app by reading Web Client.
The Set Seismic URL tool
The Set Seismic URL tool is a convenience tool written in Python that makes it easy to replace the URL values in a seismic feature class. The URLs point to the underlying seismic data in raster or ZGY formats. Whenever moving or publishing the feature class to a new location this step might be required if the underlying seismic data need to be moved as well (which is usually the case).
Click here to download the tool.
Unzip and open the tool in ArcCatalog. The tool will create a copy of the feature class and replace the URLs values. Note that you have to copy the rasters or ZGY files yourself, since the target location may be on a remote machine that is not accessible from the tool.
Manually modifying the seismic URLs
You can modify the URLs manually if you prefer:
- For ZGY files, the url should be similar to file:///c:/mydata/myvolume.zgy
- For raster files the URL should point to the raster filename without the inline, crossline or timeslice ending, ie if you have raster files c:/mydata/myvolume_inlines.tif, c:/mydata/myvolume_crosslines.tif etc the url should be file:///c:/mydata/myvolume.tif
- If you keep the raster data in the same geodatabase as the feature class the url should be of the format urn:name:<name of seismics>. So if the seismic 2D line is named LINE_43_SOUTH the URL would be urn:name:LINE_43_SOUTH