I. Multibeam Depth Editing
- Erlend Kvinnesland
- Tore Sannes (Unlicensed)
- Anders Moe
- Harald Sund (Unlicensed)
Introduction
Seafloor enables you to perform both automatic depth filtering and manual editing of sonar data.
The automatic depth filtering offers three filters:
- A threshold filter which will remove all points shallower or deeper than the threshold.
- An angle filter which measure the angle between neighbour points on the same ping and eliminate those exceeding a certain value.
- A surface filter which can calculate the standard deviation for all points and remove points outside, e.g. 2 times the standard deviation.
The manual editing is performed by the Point Cloud Editor (Multibeam Editor).
Note that none of the methods will actually delete the points. They will only be flagged as deleted, which means you can go back to the original, unfiltered version at a later stage.
The editing methods described in this section are also applicable on Point Cloud (XYZ) data.
Exercises
Automatic Filtering
Automatic Threshold filtering
- Right click the Multibeam folder inside 1. Survey Data and select Multibeam Depth Filtering.
- In the menu that pops up, check the Treshold filter box.
- To find the min and max, click the Show Survey line properties... button.
- Check both Remove shallower than depth and Remove deeper than depth and type in the min and max value.
- Leave the Angle filter box unchecked for now.
- Leave the Surface filter box unchecked for now.
- Select one or several of the survey lines.
- Click Execute.
In the report that appears you can see how many points that were flagged in each multibeam file.
View the result from the automatic Threshold filtering
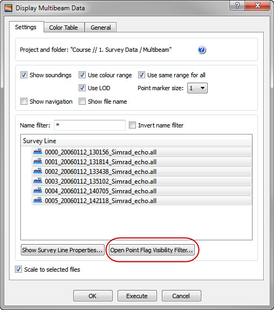
- Open the Display Multibeam Data dialog.
- Display (some of) the lines which have been filtered.
- Click the Open Point Flag Visibility Filter button in the lower part of the window.
- The Point Flag Visibility Filter dialog is opened.
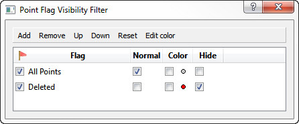
- Click the Add button on the menu bar.
- The dialog for adding filter is opened.

- Select, for instance, the ThresholdShallowerFiltered entry and click OK.
- Repeat clicking the Add button. This time, select the ThresholdDeeperFiltered entry and click OK.
- In the Point Flag Visibility Filter dialog, tick the Color checkbox for both filters.
- Click the Edit Color button and set individual colors for the filters.
The Threshold filtered points are now displayed together with the accepted points.
To remove the accepted points, tick the Hide checkbox for All Points.
Automatic Surface filtering
- Right-click the Multibeam folder inside 1. Survey Data and select Multibeam Depth Filtering.
- In the menu that pops up, check the Surface filter box.
- Click the browse icon and browse in the surface you generated in the Gridding chapter.
- Select Standard Deviation as Filter type.
- Select a Shallow factor and a Deep factor.
- Select one or several of the survey lines.
- Click Execute.
View the result from the automatic Surface filtering
To view the result from the automatic Surface filtering, the method is the same as for Threshold filtering.
- Open the Display Multibeam Data dialog.
- Display (some of) the lines which have been filtered.
- Click the Open Point Flag Visibility Filter button in the lower part of the window.
- Click the Add button on the Point Flag Visibility Filter dialog menu bar, and select the SurfaceFiltered.
- In the Point Flag Visibility Filter dialog, tick the Hilight checkbox for SurfaceFiltered (and also tick Hide for the threshold filters).
The points that are displayed are the ones that got flagged by the surface filter.
Revert flagged points from automatic filtering
- Right click the Multibeam folder in your project and select Revert flagged points.
- Check the flags you want to revert.
- Select the Survey Lines you want to revert from.
- Click Execute.
- Click Yes when asked about reverting flags for 6 files.
After the processed has finished you are presented with a report telling you how many points were reverted for each flag for each survey line.
-
Manual Editing
The Point Cloud Editor lets you manually edit points in both 3D and 2D. Removed points will be flagged as deleted, but can later be retrieved.
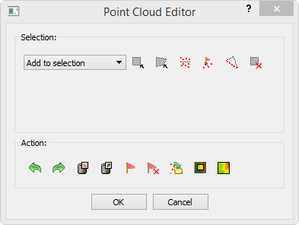
The Point Cloud Editor menu
The menu has two parts. A Selection part and an Action part.
Selection
You have to select a set of points before you can perform an action on them. There are five different ways to select points:
- Rubber band select (shortcut key R) - Click and drag a rectangle
- Lasso select (shortcut key L) - Digitize a polygon (double click to close)
- Threshold select - Select a Deeper or Shallower value.
- Expand selection to ping - First use one of the other tools to select points. Then click the this tool to select all the other points in the corresponding ping(s).
- Flag select - Select by flag type
Note that by clicking Rubber band select (R) or Lasso select (L) the 3D window will be locked until you have finished the selection. This means that you will not be able to rotate or pan during the selection process.
After selection the points will be visualized in white.
It is possible to deselect parts of a selection by changing the drop down list to Remove from selection and then perform another selection within the previously selected points.
You can also use the Clear selection icon to remove the selection.
Action
After a set of points have been selected it is possible to perform several actions on them:
- Delete them (shortcut key Delete) - The points are only flagged as deleted.
- Un-delete them.
- Flag them according to a user defined flag.
- Edit on the selected points.
By clicking Edit Selected it is possible to make a new selection only within the previous selection. This makes it easier to narrow in on points/noise you want to delete.
The green arrows allows you to redo or undo previous step, while Edit All will allow you to make all the points available for editing.
Manually edit a single multibeam survey line
- In the Multibeam folder, right click on of the Multibeam Survey datasets and select LOD Points Display.
- Click on the small triangle next to the Multibeam Survey dataset to expand all its elements.
- Right click Multibeam Sonar under the Multibeam Survey dataset and select Edit.
- Click the Rubberband Select icon.
- In the graphics window, click and drag the rubber band around an area where there are spikes you want to remove.
- Notice that the selected points are displayed in white.
- Click Delete and notice that the points are removed.
- Continue to select and flag points until you have removed all the spikes.
- Click OK.
Display removed points and undelete them again
- On the Multibeam Sonar tab in the Seafloor Main Menu click Display Multibeam Data.
- Click Open Point Flag Visibility Filter.
- Click Add.
- Select UserDeleted and click OK.
- Tick the Highlight box for the UserDeleted flag and observe that the points you deleted are now displayed in red.
- Open the Multibeam Editor again.
- Press R on your keyboard and draw a rectangle around all (or some) of the red points that you want to undelete.
- Click Undelete and observe that the points are now display normal again.
Manually edit multiple multibeam survey lines
- Click the X on the main toolbar to clear the screen.
- On the Multibeam Sonar tab in the Seafloor Main Menu click Display Multibeam Data.
- Select all survey lines and click Execute
- On the Seafloor Main Menu click Edit and select Multibeam Editor.
- Click on Rubberband Select and create a large selection area around some spikes you want to remove.
- Click Edit Selected. Notice how all points outside the selection are are now transparent while the selection area is displayed in "normal" colors again.
- Click Lasso Select and make sure to select an area containing both transparent and "normal" points. Notice that only the "normal" points are selected.
- Repeat the last two steps until you have narrowed into the spikes you want to remove.